Some variable data products (VDPs) are personalized several at a time so that the resulting order includes several variations of the same product, each personalized differently. One example is an order for business cards for certain members of your organization, with each business card having contact information for a particular person. These products are also known as batch VDPs. (Other VDPs are single-record products since they are personalized one at a time.)
For products that are personalized in one batch, the information is typically in a data source (for example, an address book that your company makes available); you select what you need from this data source. You may also have the option of creating your own data source based on an external file. In addition, for some products you can upload images to personalize the product or select images from a gallery.
After you click Begin for a batch VDP:
1. In the Job Name field, enter a descriptive name for the job so that you can identify it easily.
2. Enter the Quantity.
Tip: You can click Save My Job (at the bottom of the page) at any time to save the job specifications for future use.
A data source may already be available. Otherwise, you can upload your data from an external file:
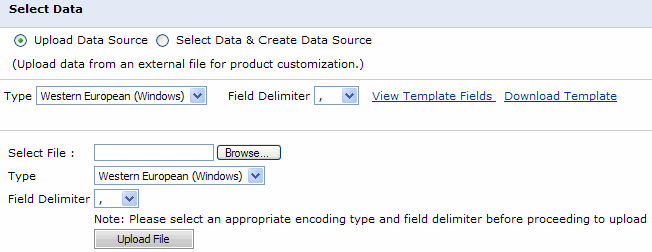
1. Under Select Data, choose Upload Data Source.
2. In the Type field, select the format of the data you are uploading.
3. In the Field Delimiter field, select the delimiter that separates values in the file, for example, , for a comma-separated values (CSV) file.
4. To use a template for your data, click Download Template. A template helps to ensure that your data source is in the correct format. (Alternatively, first click View Template Fields and then click Download.)
Note: If a sample template is available for the product, a Sample Data link is available instead of Download Template.
5. If you download a template, open it in a spreadsheet application such as Microsoft Excel or a text editor such as Note Pad that can read files in CSV format. Enter your data or import it (if you already have it in another format) and then save it as a CSV file under a new name.
Note: Text that you enter in your template file cannot contain any commas (,) or other separators unless you enclose all the text for that field in double quotation marks (").
6. To the right of the Select File field, click Browse to locate your file, make sure the Type and Field Delimiter are correct, and click Upload File.
Note: All the records in the file you uploaded are automatically selected. If you want to exclude a record, return to your template file, delete the record, and upload the file again.
7. Review the data to make sure it is accurate (free of typos and errors). If it is not, return to your template file, correct the information, and then upload the file again until the data is correct.
8. Click Next to continue to the Data Mapping step.
In some cases, data sources may already be available to you. For example, a company or university based site may have an address book that you can use. To use an existing data source:
1. Under Select Data, click Select Data & Create Data Source.
2. In the Select Data Source field, choose the source you want to use and click View.
3. Select the check boxes of the items that you want to use to personalize the product, for example, the people for whom you want to create business cards.
4. Click Next to continue to the Data Mapping step.
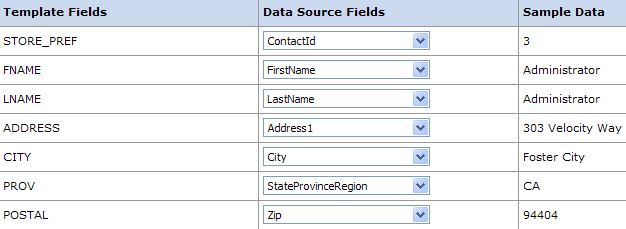
After you select or upload a data source you must make sure that the fields in the product template are mapped correctly to the fields in the data source so that the product includes the correct information.
1. Make sure the Template Fields are mapped correctly to the Data Source Fields. The information in the Sample Data column comes from the file you uploaded or the data source you selected.
2. If necessary, correct the mapping by selecting a different field in the Data Source Fields column.
3. Click Next to continue to the Personalization step.
1. If the product includes an image, either click Upload Image to provide your own image or click Select from Gallery to choose an image from a gallery of available images. (What you can do depends on the product.)
2. Use Go to Record or Prev/Next to see the personalized data for different records (based on what you provided in the data source).
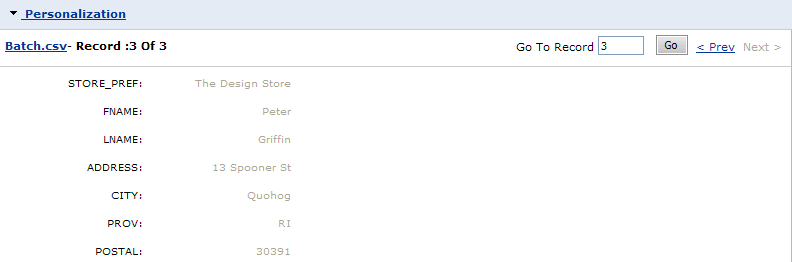
Tip: If you notice an error in the data, you can click Batch.csv, make the correction, save the file under a new name, and upload it.
3. Preview an image of the product (this step is required):
a. Click Update Preview (above the Personalization area).
b. If the product has two sides or multiple pages, use First, Previous, Next, and Last to see different sides and pages.
c. To see the product in its actual size (in a PDF), click Full-Size Preview.
4. If print options are available for the product (for example, media), select them. (For some products they are part of an Additional Options step.) The selections that are available to you depend on the product.
5. Click Next to continue to the final review step.
1. Review the summary of your order (including print options).
2. If the I approve check box is displayed, select it after you verify your order is correct.
3. Click Add to Cart.
Note: If the product is part of a kit, a Finish button is displayed instead of Add to Cart. Click Finish to continue with the process of ordering the kit.
4. Proceed with the checkout process when you are ready.